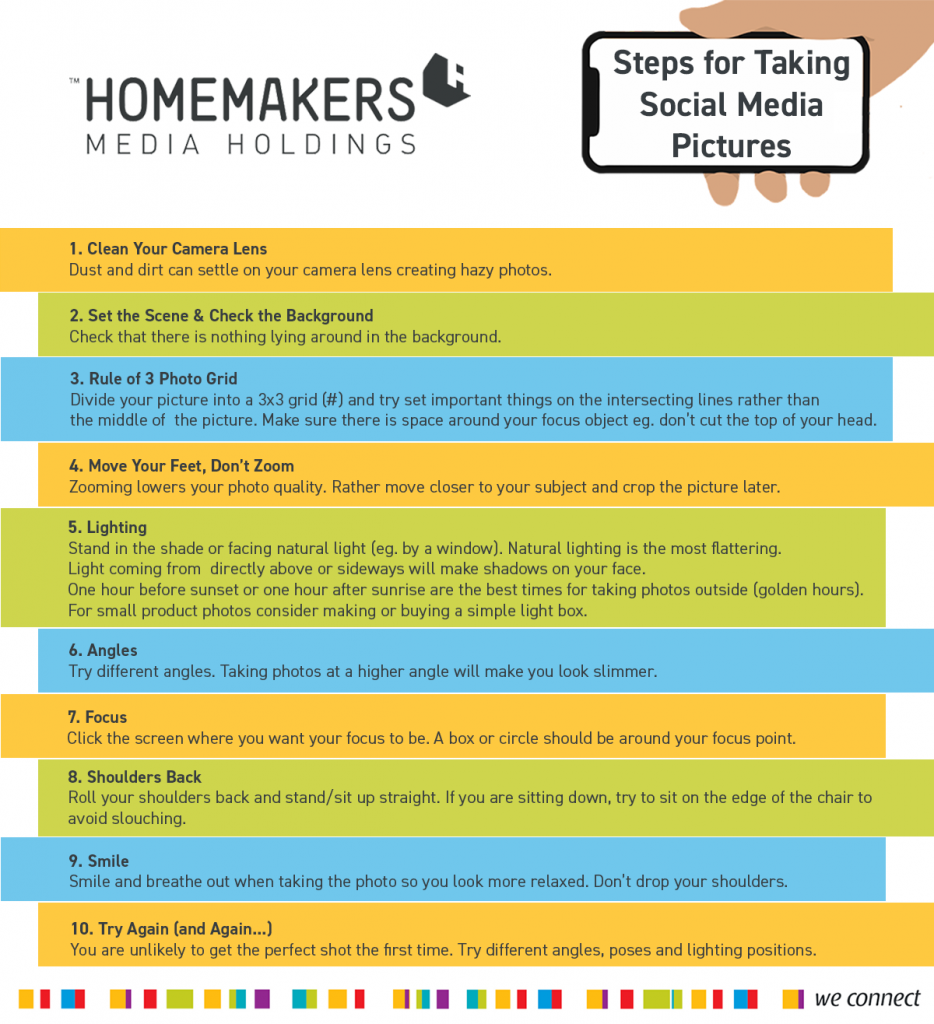
Taking Photos for Online Use
Having great photos of your products to share online, especially on your social media pages will help give potential customers a clear idea of your products when they are making a purchasing decision. Photos are also a way to show off and build your brand by allowing you to show off your work as well as your personality.
You may not always have the time or budget to hire a professional so here are 10 simple steps to taking better photos.
Clean Your Camera Lens
Dust and dirt can settle on your camera lens creating hazy photos or glare. Use a soft cloth to clean your lens before taking a photo.
Set the Scene
Set up your scene by tidying up, check that there is nothing lying around in the background that may be distracting. Taking the time to pay attention to small details makes a huge difference. Wait or ask people to step back out of your picture and check for things like trees or poles sticking out awkwardly.
Rule of 3 for Interesting Photos
Divide your picture into a 3×3 grid (#) and try to set important things on the intersecting lines rather than the middle of the picture. This will make your photo more interesting and create natural focal points. Your phone should have a grid option in the settings menu.
Move Your Feet, Don’t Zoom
Zooming lowers your photo quality. Rather move closer to your subject and crop the picture later.
Lighting for better Photos
Stand in the shade or facing natural light (eg. by a window). Natural lighting is the most flattering. Light coming from directly above or from the side will create unflattering shadows (although shadows can be used in more creative pictures). You can use a lace curtain or thin white material to soften (diffuse) any harsh light that is creating too much shadow. A piece of foil or a silver cake board can be used to bounce and control where you want light to go.
One hour before sunset or one hour after sunrise are the best times for taking photos outside (golden hours).
For small product photos consider making or buying a simple light box that will give you a clear, smooth background and professional looking picture. This is particularly useful for products listings.
Angles
Try different angles. Taking photos at a higher angle will make you look slimmer while a lower angle creates a sense of power. Different angles will also change the effects of lighting and how your background looks.
Focus Your Photos
The most important item in your picture should always be in focus. To “pull focus” or select where your focus should be, simply click that spot on your screen. A box or circle should be around your focus point. You can play around with focus by using two or three products in one photo and changing the item in focus in each picture.
Posing for Photos
When taking a photo of yourself or others, remember to have good, natural posture. Roll your shoulders back, stand/sit up straight.
If you are sitting down, try to sit on the edge of the chair to avoid slouching.
Arching your back slightly is also a great way to improve your posture in photos.
Think about what your overall body language is saying about you and your brand.
Smile
Smile and breathe out when taking the photo so you look more relaxed. Don’t let your shoulders droop when breathing out.
Try Again (and Again…)
You are unlikely to get the perfect shot the first time. Move around and try different angles, poses and lighting positions until you are confident with the picture you have taken.